|
New, daily updating edition |
|
|
Join Writer Development Section Writer Development Member Section
This Day in Alternate History Blog
|
Gallipoli
1915 A Campaign
Which Would Change A War A
Sequel to Invasion 1915 By
David Atwell
Prelude For all
intents & purposes, the 1915 German invasion of Great Britain had failed not
long after it had begun… The
conclusion to Invasion 1915 Introduction The Gallipoli Campaign was the brain
child of Winston Churchill, First Lord of the Admiralty. Although it did not go
exactly as planned, the Gallipoli Campaign was always intended to relieve German
pressure, from the other fronts in France, Belgium & Russia, by forcing
German forces to spread ever further across Europe. Furthermore, it was also a
campaign to knock Turkey, an ally of Germany, out of the war. Turkey was seen to
be the ‘sick man of Europe’ & Churchill, among others, believed that
victory would be quick. Then, with Turkey out of the war, Allied convoys could
reach the Russian Black Sea ports, & in doing so, bring desperately needed
war munitions & other supplies to the Allies eastern partner. Yet Gallipoli was undertaken at a
dangerous time for the Allies - especially for the British. Having just been
invaded by the German Invasion Army, many in Britain argued against
Churchill’s plan to divert troops & material to a campaign on the other
side of Europe. Furthermore, many even argued against sending further
reinforcements to the British Expeditionary Force in France. In the end, though,
a compromise was made wherein much of the British Mediterranean Force was to be
made up of Empire troops, whilst British troops were kept in British for use
against the German interlopers. Although Churchill was to later add a
few more British divisions than at first authorised, in other words the Naval
Division, he was only given the green light after the government had been
assured, by the British Defence Force, that the German Invasion Army was
effectively sealed up in Northumberland & Durham. Of course, it must be
noted, that the attack upon the Dardanelles, using both naval & army units,
was actually authorised prior to the invasion of Britain by Germany. As a
result, most of what Churchill had asked for was already in place in the eastern
Mediterranean region when the German invasion took place. Nothing more, however,
would be needed from Britain other than the final order to commence the
campaign. Not everything, though, as noted was to go to plan. Initially Churchill’s plan called on the Royal & French Navies to attack up the Dardanelles, pass the Turkish forts, & onwards to Constantinople. Following such a move, a corps of troops would arrive to occupy European & Asian Minor Turkey, whilst troops from India would occupy Mesopotaimia, & troops from Egypt would occupy Palestine & Syria. The naval attack, however, was not to be successful as will be discussed below. Nonetheless, Churchill was not going to be deterred &, it is due to the failure of the naval attack, that the most successful Allied land operation in the war to date would eventuate. It would also make the word ANZAC forever synonymous with Gallipoli. The ANZAC Corps successful break-out from Suvla Bay (later called ANZAC Cove), & the subsequent March to Constantinople, would ensure Allied victory. The
Naval Attack “The Allied Armada's naval attack
began on 19 February 1915. Until 13 March 1915, they continuously bombarded the
Turkish forts and opened a way for the minesweepers. However, they had
confronted with the Turks' tough resistance. The Turkish gunners did not bother
to reply the Allies' bombardment. This showed that, to open the Dardanelles was
not that easy and the Allies could have cleaned only the first five miles of the
strait. (This entire OTL passage is a direct quote from The Naval Attack, by “Aktuel”, The Gallipoli Campaign 1915. Web address: http://www.canakkale.gen.tr/eng/naval.html) Plans
& Armies Much of the Allied plans, for dealing
with Turkey, depended upon the success of the Anglo-French naval attack on the
Dardanelles. Now that the naval attack had been met with disaster, a new &
bolder plan had to be improvised. This was not all that hard, as it may seem, as
plans were around in how to deal with Turkey if the Dardanelles were ever denied
to the British. These plans, which would be modified for the current situation,
called for the landing of a force on the Gallipoli Peninsular. This force would
secure a bridgehead & then move up the European side of the Dardanelles
& onwards to Constantinople. It was as much as a bluff as anything, but the
thought that the Ottoman capital could be captured would make the Turks see
reason & hence surrender. Although the situation in 1915 demanded
much more than a bluff, the original strategy of taking Constantinople was
nonetheless the final objective of the Gallipoli Campaign. Yet, what with events
taking place in Britain at a premium, conducting any further military action
elsewhere, let alone in the eastern Mediterranean, seemed impossible. Churchill,
however, was able to argue otherwise & with much success. Demonstrating that
a land offensive at Gallipoli would require no further troops from Britain, than
he already had, he was finally given permission from a reluctant British
government to go ahead with the operation. It was just as well for the sake of
the war. For the most part, the fighting would
fall to Empire troops as only three British & three French divisions would
be “officially” involved in the entire campaign. There was, though,
regardless of what the British Prime Minister of the time had authorised, one
further British division included. This was the Royal Naval Division, which was
fleshed out entirely by surplus Royal Navy personnel, most of whom had never
fired a rifle before in their lives. However, as said, the main fighting force
would come from Empire troops, most notably the Australians, while New
Zealanders & Indians were also involved. As a result, three Australian
divisions (two infantry & one light horse) would be in the thick of the
fight along with two ANZAC divisions (involving personnel from both Australia
& New Zealand) & one Indian division. The Turks, for the most part, had an
inferior force defending the Gallipoli Peninsular in both numbers &
equipment. Even with the efforts of the German General von Sanders to
“modernise” the Turkish army, it was nonetheless substandard when compared
to most European armies of the period. Turkey had entered the First World War
unprepared, & even though it had repulsed the Anglo-French fleet attacking
the Dardanelles, a major land engagement was really beyond its ability. To add
further to its problems, only two divisions, the 9th & the 19th,
had been stationed on the Gallipoli Peninsular to counter any invasion. Supporting these two divisions, however, von Sanders had wisely stationed two more further up the Peninsular should an invasion take place. The 5th & 7th Turkish Divisions would thus double Turkish numbers defending against any Allied attack. Finally, the Turks had the 12th & 14th Divisions guarding the northern exit of the Peninsular. In many respects, the Turks had organised a reasonable defence under the circumstances. What the Turks did not know, however, were the Allied plans or their overall strength of numbers, let alone the capabilities of the Australian solder.
The
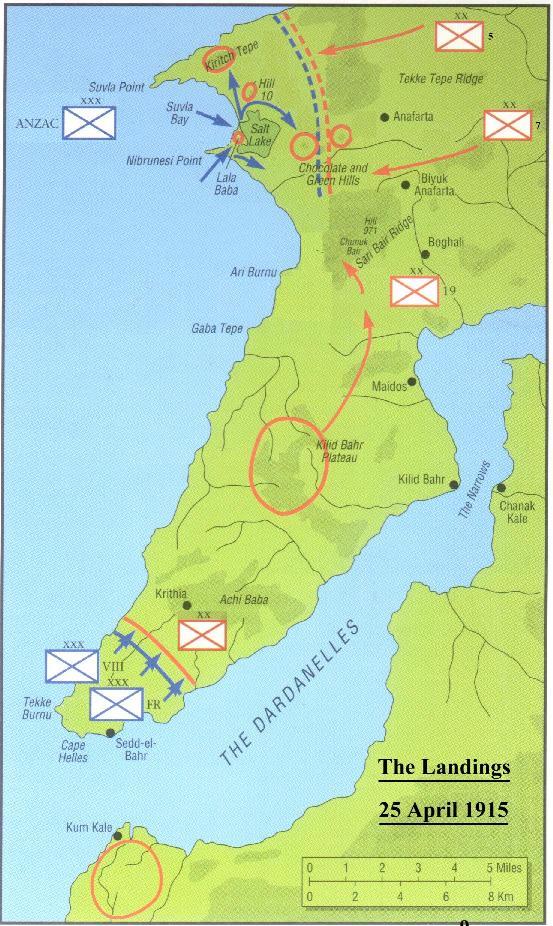
Landings The invasion of the Gallipoli Peninsular
took place in the pre-dawn light of 25th April 1915. There would be
two important locations where the Allied troops came ashore. The first was at
the tip of the Gallipoli Peninsular, whilst the most important was at Suvla Bay.
The thing, though, that concerned the British planning staff was the impact of
the tides & not the Turkish defenders. Several Royal Navy officers were
quick to point out that, during the landing phase, the landings could take place
at the wrong location, considering the invasion of Turkey soil was to take place
in darkness. Thus elaborate plans were put in motion to ensure that the Allies
landed in all the right places. This was harder to do in practice than
in theory. Still, the leading echelons of troops, all in boats, had a Royal Navy
liaison officer with them, who’s job it was to ensure that the right location
was reached. It meant that fewer infantrymen went in with the first wave, but
the danger of landing at the wrong place was deemed far more important. Just as important, too, was the fact
that the next waves all landed at the correct location. Again, darkness could
ensure that, even though the first wave may have landed at the correct location,
there was no reason whatsoever that the rest of the infantry would make it to
the right place at the right time. As result of these concerns, the Naval
officers, who arrived with the first wave, would have a special lantern with
them that had a single lens which concentrated light in the one direction.
Coloured, so that the next waves knew exactly where to head for, the entire
landing turned out to be more than adequately successful. As a result of these initiatives, the
great bulk of the initial invasion force was able to come ashore relatively
unchallenged by the Turkish defenders. This, however, was soon to change. On the
southern landings at Cape Helles, the British & French soon found themselves
with a battle on their hands. They had just begun to advance inland, not more
than 500 metres, before the defenders realised the situation taking place on the
beaches before them. The fighting soon became quite intense as the Turks fought
stubbornly. Soon, the British & French had to call upon, as dawn broke, the
supporting naval ships for several bombardments. Not all of these were
successful, even though, the British & French were able to push the
defenders back some two kilometres from the original landing zones. The Australians & New Zealanders, on the other hand, could not of had it easier. The initial landings were exactly where they were supposed to take place. As a result, they had an easy time disembarking on land & an open plain before them to advance. This was essential, in the staff planning, in order for the ANZACs to quickly form up & push inland, as the overall plan required the British & French to hold down the Turkish defenders on the Peninsular itself, whilst the ANZAC Corps cut them off at the northern end.
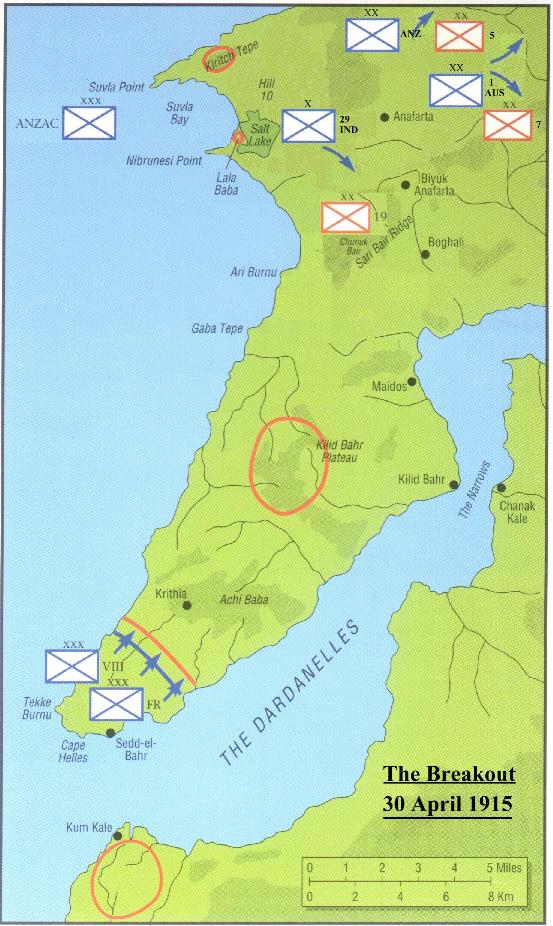
Success
At Suvla Bay Within hours of the landings, all
appeared to be going exactly as planned. The British & French had done their
part, although with more casualties than hoped for, but nonetheless the ANZACs
were ashore & heading inland. The ANZAC Corps, however, soon found
themselves facing two Turkish battalions which had dug themselves in. Battle was
soon given, & such was the ferocity with which the Turks offered in defence,
the invasion forces had to take stock in their attacks. This situation would, though, change
once it was realised that less than 2 000 enemy troops barred the way to the
ANZAC advance. Although it would cost the ANZACs over 3 000 casualties, in their
head long attack, they soon overwhelmed the Turkish defenders & were once
again advancing east. All seemed fine until, though, reports began to reach the
Australians that two Turkish divisions were heading towards them. Already, the
Turkish commander on the scene, Mustafa Kemal, had summed
up the overall position & had called for reinforcements. The overall commander, the German von
Sanders, was at somewhat odds with the Turk Mustafa. There were various reasons
for this, but primarily, Sanders had seen, on the Western Front in France, what
stubborn defences could do to infantry. As a result, instead of withdrawing from
the Peninsular & attacking en masse the ANZACs at Suvla Bay, the two Turkish
divisions, that were on the lower part of the Peninsular, were ordered to stay
put. In many respects, this was exactly what the Allies wanted. As such, instead
of the ANZACs taking on all four Turkish divisions, the ANZAC Corps only had to
take on two of them. Still, that meant that the ANZACs would
have to take on the Turkish 5th & 7th Divisions all
the same. And the Turks were going to offer a savage fight as a result.
Ironically, though, Sanders fears about how infantry faired
in the face of stubborn defence was about to come true. General Birdwood,
commander of the 1st ANZAC Corps, immediately ordered a defence of
the Suvla Perimeter. No sooner had the Australians & New Zealanders dug
primitive trenches, did the Turks attack. For four days, the Turks went on
attacking with little concern to casualties. The death toll was horrific. The
Australians, knowing full well if they were pushed back meant their
annihilation, & stood firm in the face of the Turkish onslaught.
The Allies brought everything to bare against the Turks, including a
savage bombardment from the Allied ships off Suvla Bay. The most important of these savage
battles took place around the Chocolate & Green Hills. The 7th
Turkish Division, which had kept to a minimum on the first two days of battle,
launched a divisional attack amounting to all 15 000 troops of the division. The
Turks, even at one point, managed to push the Australians of the 1st
Division back from their defences, only, in turn, to be pushed back themselves.
By the end of the day, some 8 000 Turks had become casualties, whilst 4 000
Australians were also dead or wounded. The crunch time came, however, on the 30th April. With Allied reinforcements coming in the shape of the 2nd ANZAC Division, 2nd Australian Division & the 29th Indian Brigade, the ANZAC Corps counter-attacked all along the Perimeter. The Turks soon found themselves in full retreat & the 19th Turkish Division had to commence defensive operations against the 29th Indian Brigade. Effectively, however, the 5th & 7th Turkish Divisions ceased to exist. The
ANZAC Break Out As a result of the ANZAC counterattack
around Suvla Bay, the 1st Australian & 1st ANZAC
Divisions began to advance with little opposition across the Peninsular in order
to cut off the two Turkish divisions to the south. This was achieved with some
effort, fore by now Mustafa was well awar of the situation. Sanders, too, became
deeply concerned &, as a result, gave the go ahead for Mustafa’s own 19th
Division to counterattack the southern flank of the ANZACs advance. This was all Mastafa needed to go from
the defence to offensive by attacking the 29th Indian Brigade. But,
the Indians were as professional as anyone else. They knew how to fight &
were not to be overrun as easily as Mustafa was led to believe. The Indian
Brigade could, thus, be extremely proud of its performance. Under constant
attack for two days, from the Turkish 19th Division, they managed to
stubbornly hold on until the Turkish attacks finally gave way. They had given as
much as they got &, although their causalities were high, they had ensured
that the ANZAC flank was protected. The all important ANZAC attack across the
Peninsular could thus continue. Furthermore, the Indians wrote their name into
history at Gallipoli with much valour & honour. Still, on 1st
May, the Indians were replaced by the second wave of troops which had
been kept in reserve since the initial invasion. These principally included 2nd
French along with 43rd & 52nd British Divisions. By
committing these troops, the commander of the Gallipoli Offensive, Birdwood,
had, however, no powerful reserve left, save for two Indian Brigades
the Australian & New Zealand (ANZAC) Mounted Division. Nevertheless,
as fate would have it, Birdwood’s decision turned out to be fundamental in
avoiding disaster. Meanwhile, the ANZACs Corps went on the offensive. Knowing that their flank was secured, all four ANZAC Divisions moved east against pitiful opposition. Only a handful of troops, the remnants of the 5th & 7th Turkish Divisions, were the only thing in its way from capturing the town of Gallipoli itself, & with it, cut off the two Turkish divisions still on the Peninsular. The only problem, now, was the fact that the 12th Turkish Division had dug in around the town in order to stop the Australians reaching this all important objective. Thus on the 5th of May, the ANZACs would have another battle on their hands. In anticipation of this, the ANZAC Mounted Division landed at Suvla Bay. Within 24 hours, it found itself in reserve near the town of Gallipoli waiting for a breakthrough. It would, though, have to wait a little longer than expected. The
Turkish Counterattack If the Indian Brigade thought that they
were going to get some rest from the fighting, they were soon to be
disappointed. On the day after they were withdrawn, the Turks launched their
surprise counterattack. Nothing like it had been seen previously, for the
struggle of the Peninsular to date, as the Turks were desperate & determined
to smash the invading army & drive it into the sea. Yet as much as the
Turkish counterattack a surprise to the Allies, the Turks were in for a surprise
as well. Nonetheless, that had not stopped the Turks, during two nights of
preparations, from transporting two divisions, the 3rd & 11th
Divisions, across the Dardanelles in secret. Yet, thinking that their were up against
only one brigade, with possibly only another in support, the Turks soon
discovered, to their horror, that the 2nd French, 43rd
& 52nd British
Divisions had taken over the front line facing 19th
Turkish Division. Having not known of this recent deployment, the Turks,
nevertheless, had stealthily moved their 3rd
& 11th Divisions
into place, after crossing the Dardanelles, into positions in the line next to
the 19th Turkish Division. Thus at dawn, on 6th May 1915,
the Turks opened a savage attack. This battle, well known to the Turks as
their last desperate affair, was actually two different engagements. The lessor
part of the Turkish plans involved the 12th Division demonstrating in
order to catch the attention of the troops ANZAC Corps. This was more or less
achieved with little effort, but the main part of the engagement was to the
south. With little regard to personal safety,
the three Turkish divisions attacked simultaneously over a four kilometre front.
The Allies were, without a doubt, surprised, but somewhat prepared all the same,
by this ferocious attack. At several locations, the Turks managed to break the
Allied line & got into the rear areas of the Allied divisions. Desperate
battles thus took place almost everywhere. Hence there was, by midday on 6th
May, no true front line to speak about as companies & battalions more
or less had individual engagements at various locations. More to the point, it
appeared at one point that the Turks, should they have any further
reinforcements, could trap the ANZAC Corps concentrated further north around the
town of Gallipoli, not to mention push the British & French into the sea. Unlike the Turks, however, the Allies did have reinforcements to call upon, even if this only meant the exhausted Indian 29th Brigade, & the two recently arrived brigades that made up the rest of the Indian Division. Nevertheless, & far more importantly, it was enough for the Allies. By 3pm, the Turkish threat had been averted &, after several savage encounters, the Turks had either been killed, taken prisoner, or pushed back to their starting positions. Although the Allied forces had taken a sever beating, the last attack of the Turkish Army had been defeated.
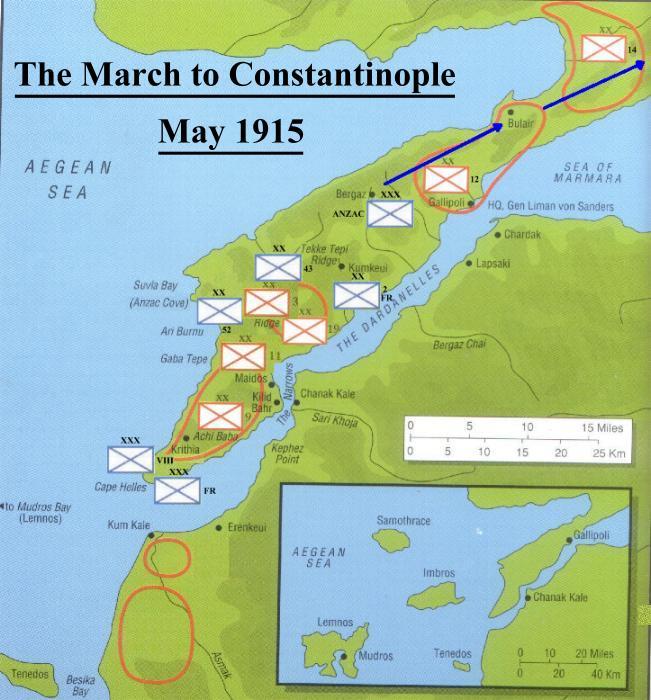
The
March to Constantinople The next day, after the massive Turkish
counterattack, the 2nd Australian & 2nd ANZAC
Divisions went on the attack at the town of Gallipoli itself. It did not take
long, as a result, for the defending 12th Turkish Division to find itself in serious trouble. Having
said that, the Australians did not get it all their own way as, just as it
appeared that the 12th Turkish Division was about to break, the
Australians discovered that the Turks had been reinforced by their 14th
Division. At ANZAC headquarters, this event was
greeted with some glee, even though the soldiers in the front lines though
otherwise. But according to military intelligence, it meant that the last actual
Turkish division available for the defence was now entering the battle. If the
Turks were to be defeated now, little would stand in the way of an Allied
advance to Constantinople. As a result, tomorrows battle would include all four
ANZAC divisions, whilst the Light Horse & Mounted Troopers would be readied
for the pursuit phase. And so it was, on 8th May
1915, possibly the most important battle to take place thus far on the Gallipoli
Peninsular, now took place. Out numbered by four to one, the Turks gave a good
account of themselves regardless of their dire situation. Having thrown back
three assaults by the ANZACs, which caused nearly 4 000 casualties, Birdwood
decided to hit them with every piece of artillery he could find. Thus at midday ten Allied batteries
opened fire on the Turkish defences. It went on for an entire hour. The sound
was deafening. The Turks had experienced nothing like it. It was even greater
than when the Allied Navies tried to force their way through the Dardanelles a
few months before. By the time the artillery had finished their part, 20 000
Australians & New Zealanders went in to finish the job. Although there were
numerous pockets of Turkish resistance, the ANZACs enjoyed large numbers &
took little time in gaining victory. Yet if the Turks thought that they could
gain precious time, even though a defeat by defending the Gallipoli township to
the last, they were to be disappointed. Immediately after the Australian
infantry had killed or captured the last Turkish soldier, the ANZAC Mounted
Division was given its orders. Having stayed out of any fighting, until now, the
horsemen had to endure the reticule from their fellow countrymen. Now the
Australian Light Horse, & their cousins the New Zealand Mounted Troopers,
were given the opportunity to knock the Ottoman Empire out of the Great War. And so the Mounted Division charged off
north, not stopping for anyone. At first, they came across many Turkish units
making as best they could away from the Gallipoli battlefields. These were
rounded up as prisoners, but these soon became a problem as hundreds soon turned
into thousands. The Turks had fought as well as anyone, but they were clearly
defeated. Even now, being taken prisoner was already anticipated. As the Mounted
Division continued on its demanding advance, they did not bother to take
prisoners any more. Such was the mental state of the Turkish units that they
came across. Not far behind the Australian Light
Horse, the entire ANZAC Corps came marching. Soon they too came across hundreds
of Turkish soldiers just waiting around to surrender. At first, some of the
Turks tried to resist the Light Horse, but when it became well known that they
would be treated well, then the Turks volunteered by the thousands into
captivity. By 12th May, the Australian
Light Horse found themselves gazing upon Constantinople. There had been no major
resistance to their advance, save for the odd occasion. Not far behind the
horsemen, came the Australian & New Zealand infantry. But if the Allies
thought that they could march straight into the great city without a fight,
well, surprisingly, they were right for once. Acting cautiously, whilst waiting
for the infantry to arrive, several scouting parties were sent into
Constantinople to gain intelligence. One such party even bumped into some
Turkish officers who, after a brief verbal exchange, communicated to the
Australian horsemen that they were willing to discuss terms of surrender. Word quickly got back to ANZAC headquarters &, the next day, General Birdwood arrived to ascertain the accuracy of the matter. Thus, under a flag of truce, Birdwood entered Constantinople, with a small escort, to meet the Turkish officers in question. Upon arriving at the headquarters to the Turkish Army, Birdwood sat down to discuss an armistice with none other than Mustafa Kemal. The two chatted briefly, almost as old friends, whilst an agreement was arranged for the Turkish surrender. Although Mustafa made it clear that he could only surrender Constantinople & European Turkey, it was more than enough for Birdwood to accept on behalf of the Allies. Aftermath On 18th May 1915, with
Constantinople in the hands of the Australians, the Ottoman government had had
enough. Having more & more of the newly named ANZAC Army arrive outside of
Constantinople, made the Ottoman
government request a cease-fire shortly followed by an overall armistice.
Surrender negotiations would follow a short time thereafter. Alas the
Australians would not be involved with any these negotiations except in the
initial armistice with Mustafa & the granting of the overall cease-fire.
Instead, the British & French were solely involved in the ultimate surrender
process. Not even the Russians were granted any audience with the Ottoman’s,
& could only make “requests” to their allies, during the negotiation
period in late May & early June. The long term consequences, for both the
Ottoman Empire & the Central Powers, were to be harsh. Six months after the
official surrender to the Allies, the Ottoman Empire broke up under the strain
of Arab rebellion, Allied demands for territorial “protectorates”, & the
internal political manoeuvres of the group known as the Young Turks. At the head
of this group Mustafa Kemal, the commander of the Turkish 19th
Division & the Turkish counterattack that almost succeeded, soon made his
presence felt when civil war broke out in Asian Minor (modern day Turkey) a year
later in 1916. Then, two years would go by whilst Turkey involved itself in her own little war, whilst the Great War ragged around her. In the end, not only did Mustafa Kemal win, but Turkey itself would arise from the ashes, like a phoenix, from both the Great War, & her own civil war, to become a modern nation unto herself. The same story, though, of defeat, followed by triumph, could not be said for the remaining Central Powers. However, the future experiences of these countries & empires is a story for another time & place. Bibliography Texts
Adam-Smith, P. The Anzacs, Melbourne, 1978. Haythornewaite, P. J. Gallipoli 1915, London, 1991. Hickey, M. The First World War - The Mediterranean Front 1914-1923, Oxford, 2002. Perrett, B. Megiddo 1918, Oxford, 1998. Internet Aktuel, The Gallipoli Campaign 1915. (http://www.canakkale.gen.tr/eng/naval.html) Baker, C. British Army Units and Formations, (http://www.1914-1918.net) Derall, G. & DiGiulian, T. Warships1, (http://www.warships1.com/) comments powered by Disqus
|